Everything Appushy does.
Step by step, grounded in exactly what the plugin does today.
On this page
Getting Started Before You Start Connecting Appilix Push Automation Customer Identification Notification Logs & Retries Troubleshooting & FAQ Pro FeaturesHow to install and set up Appushy
Install and activate Appushy the way you would any other WordPress plugin — from Plugins → Add New, or by uploading the zip file, then clicking Activate.
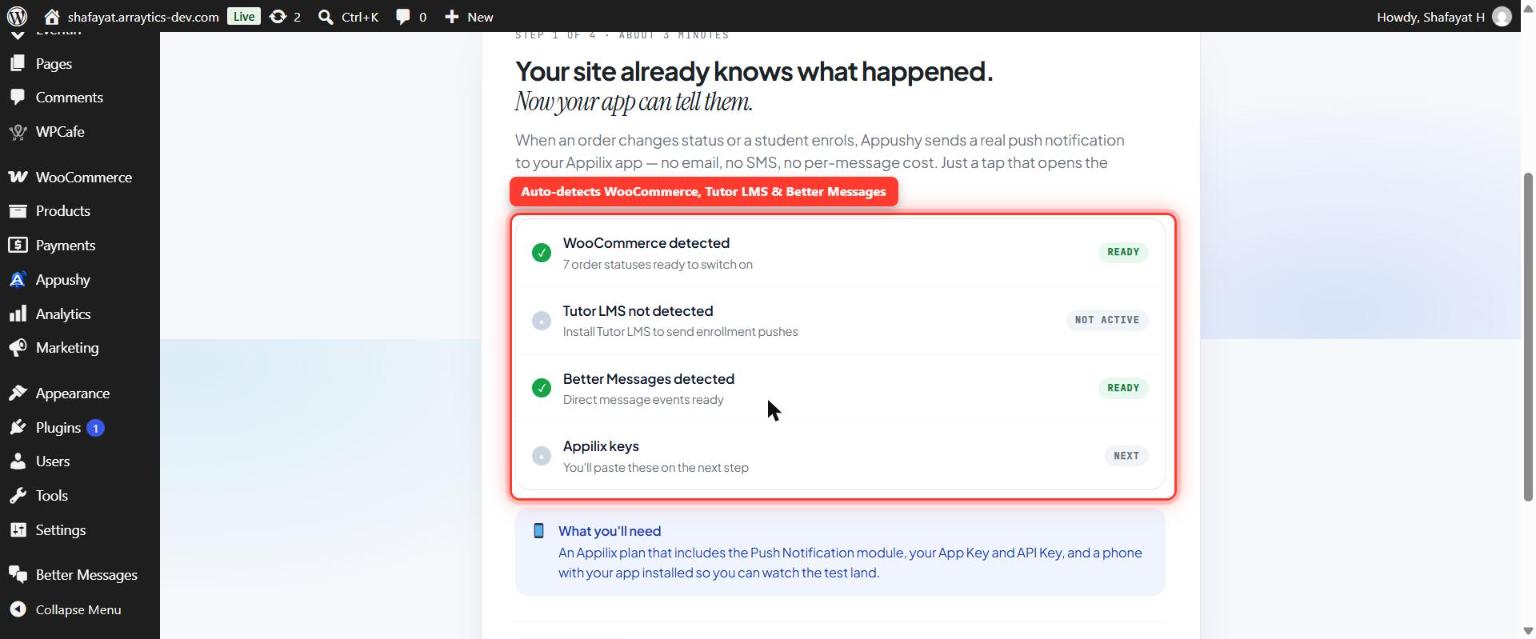
Appushy works with WooCommerce, Tutor LMS, and/or Better Messages — activate whichever of the three you actually use. Appushy detects each one automatically and never requires any of them just to install; each integration only turns on once its own plugin is active.
Right after activation, you're taken straight into a short guided setup wizard: paste your Appilix App Key and API Key, then send a test push to confirm delivery to a real device. If you'd rather skip it, Skip setup is available on any step and takes you straight to Appushy → Settings, where you can connect and test manually at any time.
How to prepare Appilix before you install Appushy
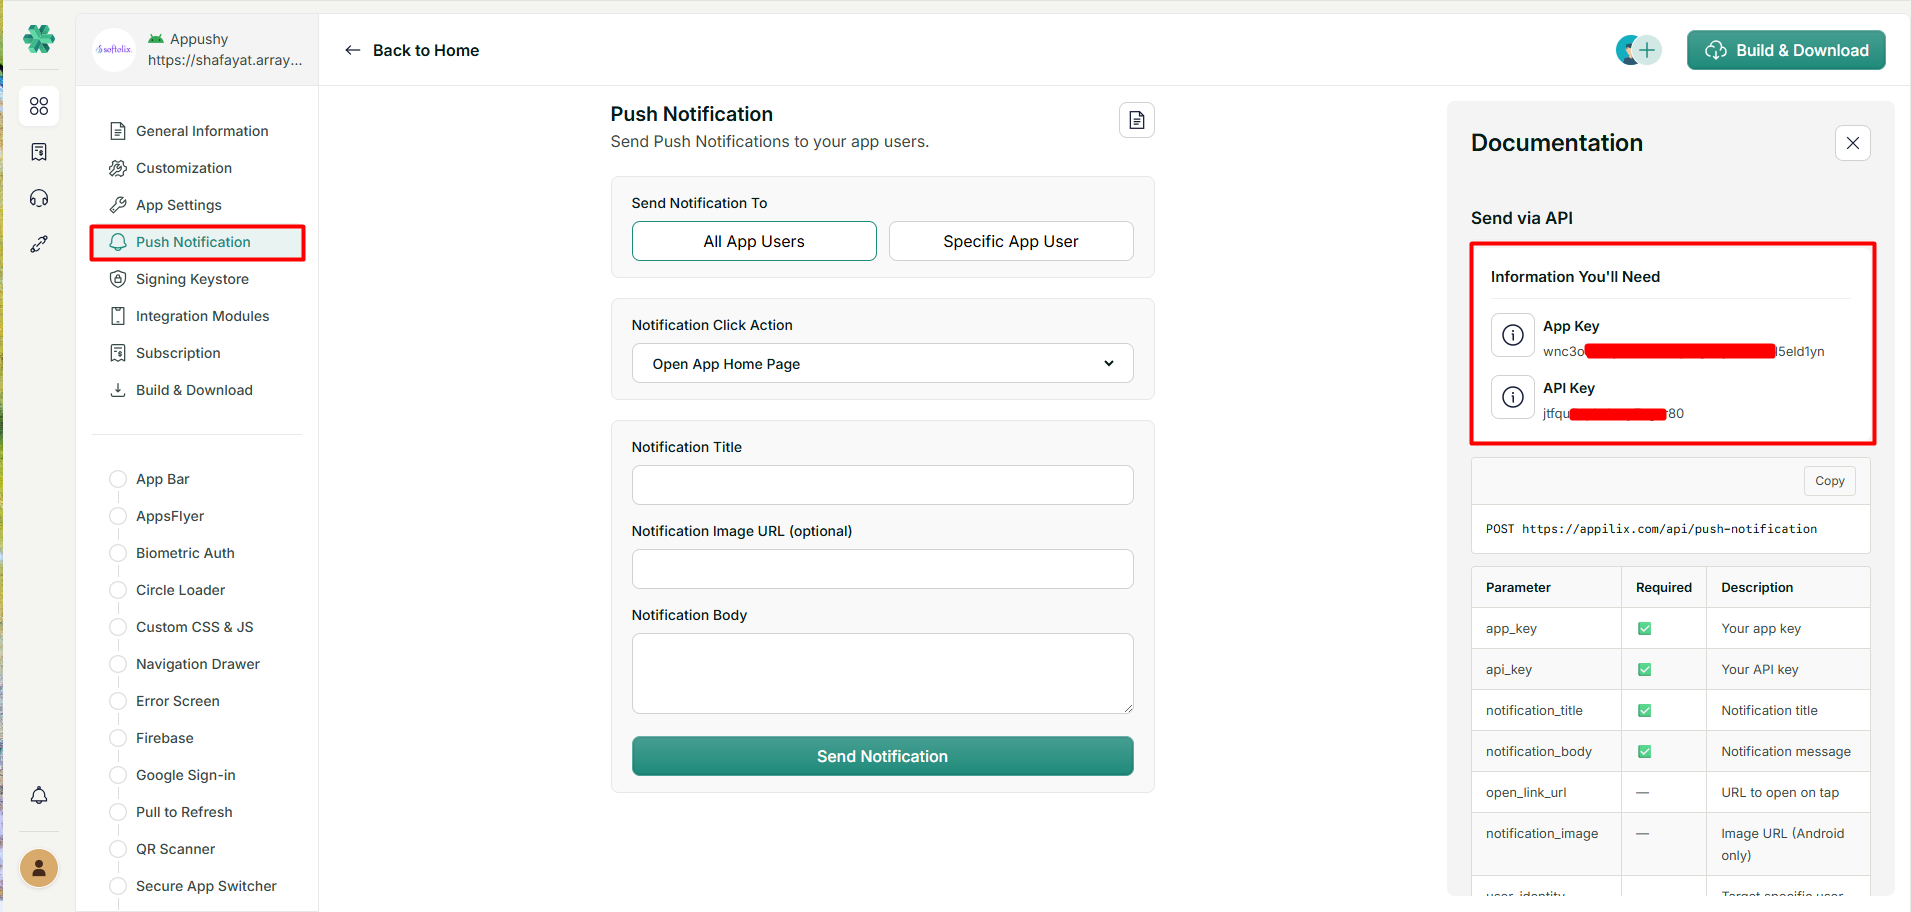
Appushy sends push notifications through Appilix, so get these three things right on the Appilix side first — skipping them won't break anything, but your test pushes simply won't arrive until they're done.
- Get a paid Appilix plan. The Push Notification API isn't included on Appilix's free trial.
- Connect Firebase to your Appilix app. In your Appilix dashboard: create a Firebase project, add your app to it with the matching package name (Android) or bundle ID (iOS) plus your app's SHA-1 fingerprint, enable the Cloud Messaging API (V1), grant Appilix permission using the same Google account, then upload the Firebase config file Appilix asks for (
google-services.jsonfor Android,GoogleService-Info.plistfor iOS). - Rebuild and reinstall your app. Your Firebase configuration is baked into the app binary at build time, not downloaded later — if your test device has an install from before you did steps 1–2, it will never receive a push until you rebuild in Appilix and reinstall.
Two optional extras, while you're in the Appilix dashboard: a custom notification icon (Android, single-colour transparent PNG, 200KB or smaller) and a custom notification sound (Android .wav or iOS .aiff, 1MB or smaller). Neither is required to get started.
How to connect your Appilix app
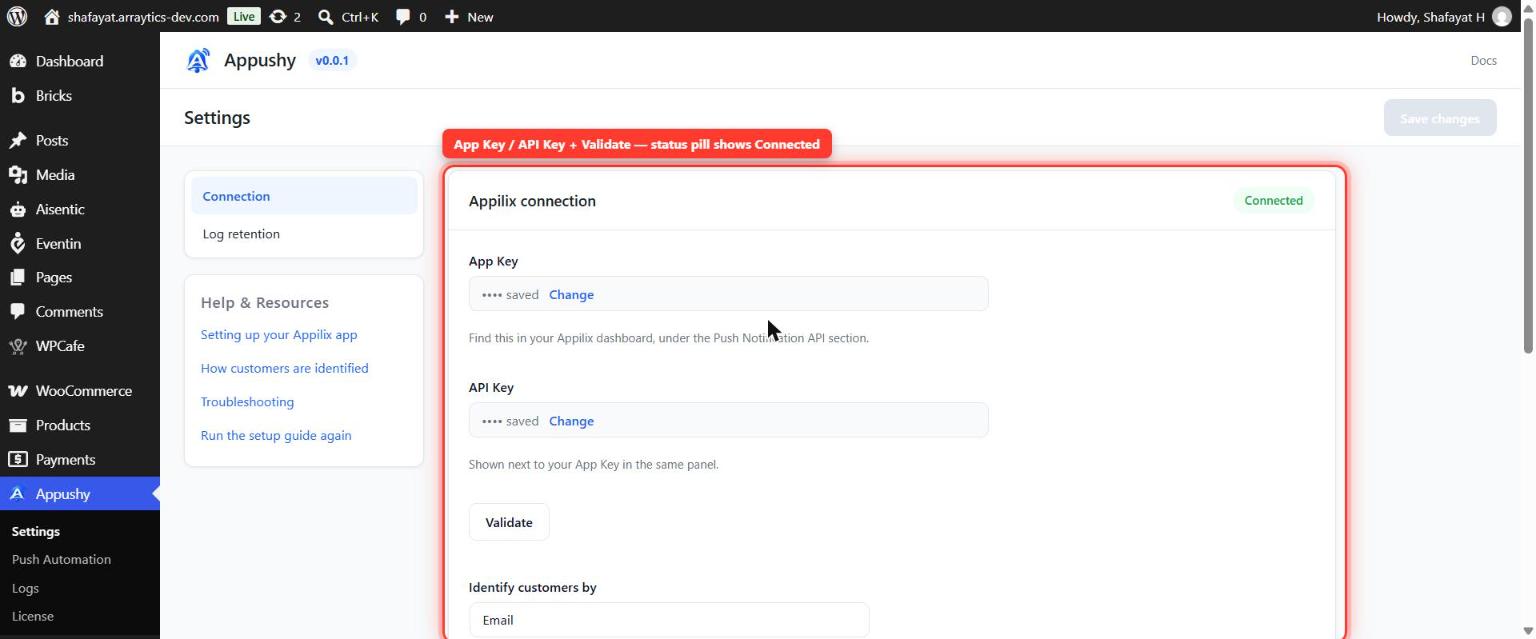
Go to Appushy → Settings. The first card, Appilix connection, is where you tell Appushy which Appilix app to send pushes through — you'll need two values, both from your Appilix dashboard's Push Notification API panel: your App Key and your API Key.
Paste both in, click Save changes, then click Validate to confirm they actually work — Validate always checks whatever is currently saved, not whatever you've typed but haven't saved yet. The status pill in the page header tells you your real connection state at a glance: Not connected (no keys saved), Not verified (saved but not yet confirmed, or changed since the last check), Connected (Appilix confirmed these exact keys work — the only state that means notifications will actually go out), or Connection failed (the last check against these keys failed).
Once credentials are validated, use the same card's Test identity field and Send test push button to confirm, end to end, that a push actually reaches a device. Appilix only learns about a device once someone opens the app and signs in from inside it — so the identity you test with has to match whatever's actually signed in on the device you're testing against.
How to turn on push notifications
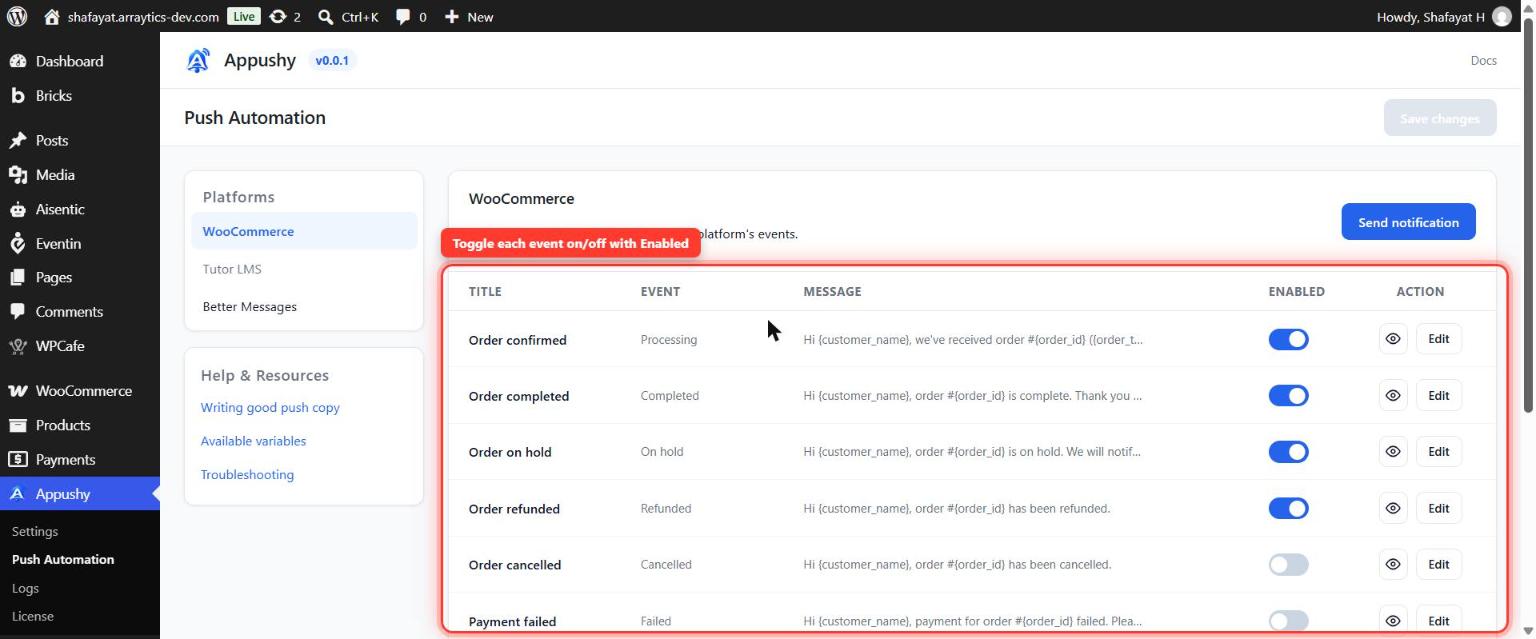
Go to Appushy → Push Automation to see and toggle every notification each connected integration can send. Free-tier notification text is fixed and pre-written per event — filled in automatically with details like the customer's name and order number, not something you write yourself in the free version.
| Integration | Event | Free / Pro | Notes |
|---|---|---|---|
| WooCommerce | Pending payment, Processing, On Hold, Completed, Cancelled, Refunded, Failed | Free | All 7 statuses, no send caps. Four come enabled by default; three (Received, Cancelled, Payment failed) start off so you can review the wording first. |
| Tutor LMS | Enrollment | Free | Sent automatically when a student enrols in a course. |
| Tutor LMS | Completion, Assignment graded, Course access expired | Pro | Visible with a padlock on the free plugin; a "Try a sample notification" preview lets you test the wording without a license. |
| Better Messages | Direct message | Free | Sent when someone gets a new unread direct message. Timing depends on Better Messages' own settings, not Appushy — see Troubleshooting. |
Manual sends — the "Send notification" button on any integration's own panel, and Settings' own test push — always go out immediately, with no queue and no dependency on any of the timing above.
How to get notifications to reach the right customer
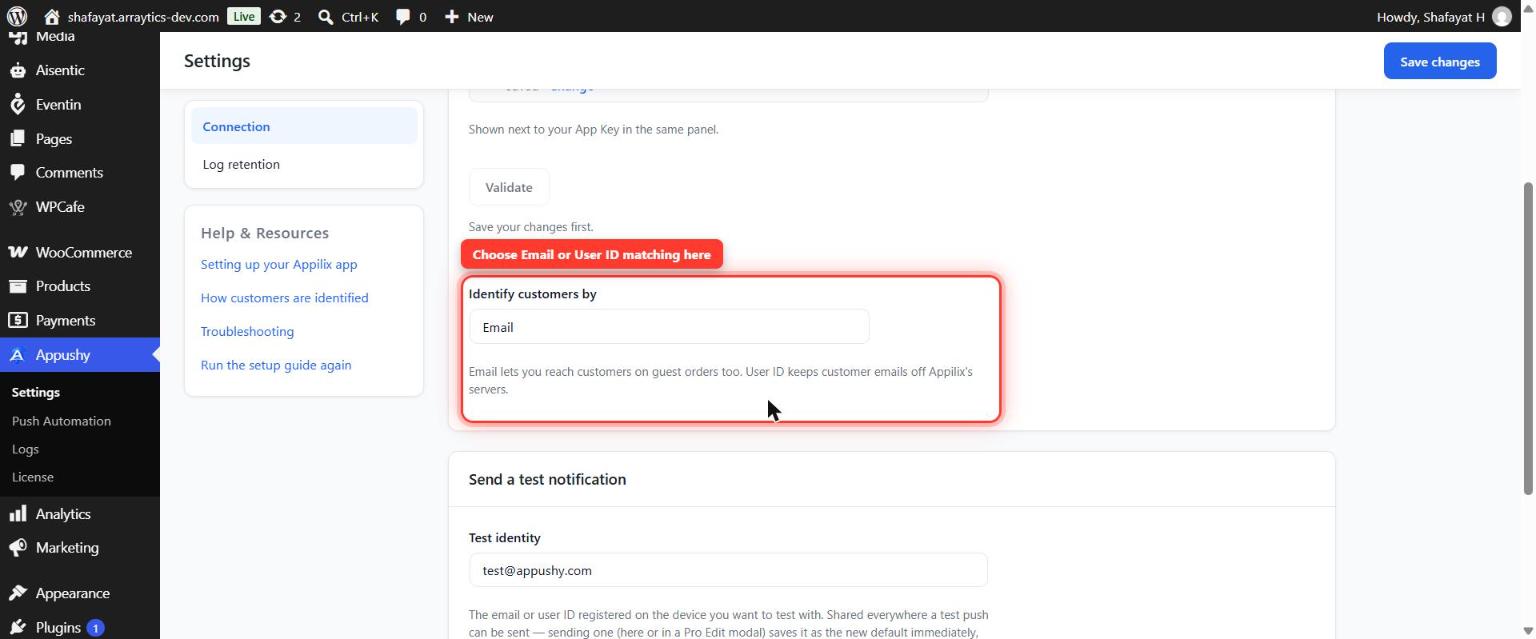
Appilix delivers a push by matching an identity — an email address or a WordPress user ID — not a customer record in your store directly. Choose which one under Appushy → Settings → Identify customers by:
- Email (default) — matches by the customer's email address, including the billing email on a guest checkout.
- User ID — matches by WordPress user ID instead, keeping email addresses off Appilix's servers entirely, but only works for signed-in, registered customers; a guest checkout has no user ID to match against.
Guest checkouts are covered automatically when identifying by email: Appushy registers the order's billing email with Appilix on the order-confirmation page, whether or not the customer ever created an account.
How to read your notification logs
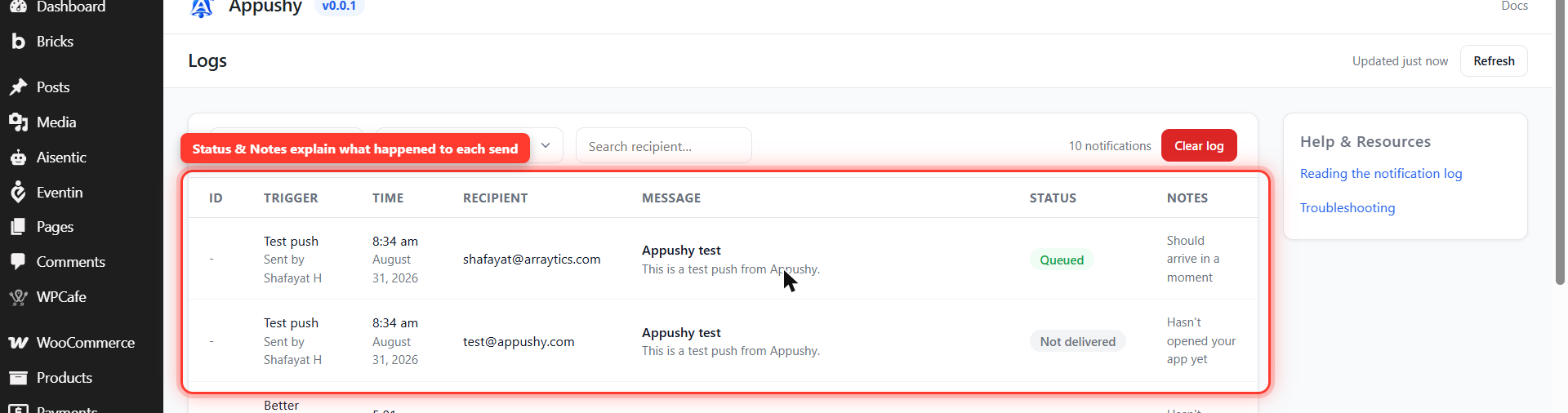
Appushy → Logs shows every push notification your store has sent — the last 100, with automatic pruning after however many days you choose under Settings (leave it empty and logs are kept forever). Each row shows a status:
- Queued — accepted by Appilix and handed off for delivery.
- Not delivered — this customer hasn't opened your app yet. Normal, not an error, especially right after a fresh install.
- Failed — something went wrong, with the reason shown underneath.
Seeing the same event more than once isn't a duplicate: if the first attempt comes back "not delivered," Appushy retries automatically — 30 seconds later, then 2 minutes, then 5 minutes — before giving up, with each attempt logged as its own row.
What "Queued" actually means
A Queued row means Appushy successfully handed the notification to Appilix's API — it's confirmation of a successful handoff, not confirmation that a phone actually displayed anything. Delivery after that point depends on Appilix and Firebase Cloud Messaging: Appushy logs that it successfully handed a notification to Appilix's API, not that a specific device actually displayed it. If a notification stays "Queued" but never visibly arrives, that's almost always an Appilix/Firebase-side delivery issue — a stale device token, notification permissions off, battery optimization, a transient FCM delay — rather than anything Appushy's own log can diagnose further.
How to fix common problems
Why isn't a customer receiving notifications?
Almost always because they haven't opened your app and been identified yet. Appushy's log will show "Not delivered — Hasn't opened your app yet" for these — the expected, normal outcome for a customer who hasn't used the app, not an error.
Why do automatic notifications sometimes arrive a minute or so late?
That's WordPress's own background task scheduling (Action Scheduler), not Appushy or Appilix — by default it only runs when someone visits your site, so on a quiet site a notification can wait briefly for the next page load before it's sent. For instant delivery regardless of traffic, set up a real server cron job instead of WordPress's default: add define( 'DISABLE_WP_CRON', true ); to wp-config.php, then have your host run wp-cron.php on a real schedule — the same fix WooCommerce itself recommends for order-processing timing. Manual sends aren't affected; those go out immediately.
Why are Better Messages push notifications delayed?
Better Messages only checks for offline users' unread messages on its own schedule — the Notification Interval setting (Better Messages → Settings → Notifications; in minutes, default 15) — so there's an inherent wait of up to that many minutes before a message is even considered for a push, on top of Offline Delay on the same settings page (how long the recipient must have been away before they qualify at all; 0 means no wait). Notification Interval has an effective floor of 1 minute — setting it to 0 turns the feature off entirely, it doesn't mean instant. The same WP-Cron-vs-real-cron caveat above applies here too, since Better Messages' own check is itself a scheduled WordPress task. To minimize the delay: set Notification Interval to 1 and Offline Delay to 0 in Better Messages' own settings, and set up real server cron as described above. This is Better Messages' own behavior — Appushy only sends once Better Messages itself decides to fire, and can't speed up Better Messages' own schedule.
Does this work for guest checkouts?
Yes, when identifying customers by email (the default). Appushy registers the order's billing email with Appilix automatically on the order-confirmation page, whether or not the customer has an account.
Can I customize the notification text?
Not in the free version — each event has fixed, pre-written text with variables like the customer's name and order number filled in automatically. A template editor is a planned Pro feature — see Pro Features.
Is my Appilix data safe?
Your App Key and API Key are never displayed after saving (masked in the UI) and never appear in the notification log. Appushy sends your Appilix credentials, the customer identity being targeted, and the notification title/message directly to Appilix's own API — never through any third-party server other than Appilix's own.
How to Manage Your License and upgrade to Pro
The free plugin on WordPress.org covers all 7 WooCommerce order statuses with no send caps, no trial, and no watermark. Appushy Pro adds:
- Notification template customization — edit the title and message text for any event, instead of the free version's fixed, pre-written copy.
- Priority support.
- Full Tutor LMS event coverage — completion, assignment graded, and course-access-expired pushes, on top of the free enrollment event.
See Pricing to purchase a plan.
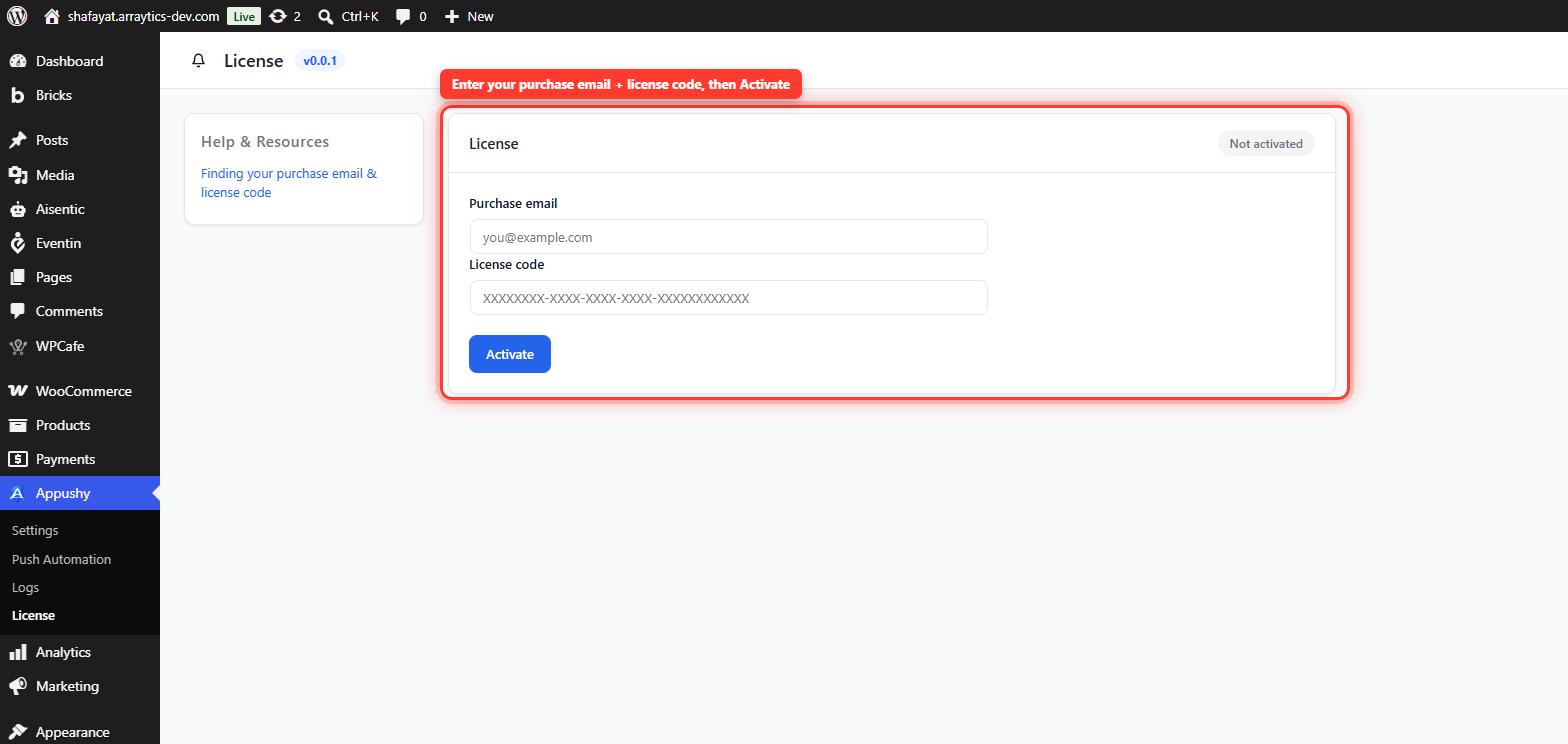
How to add your license
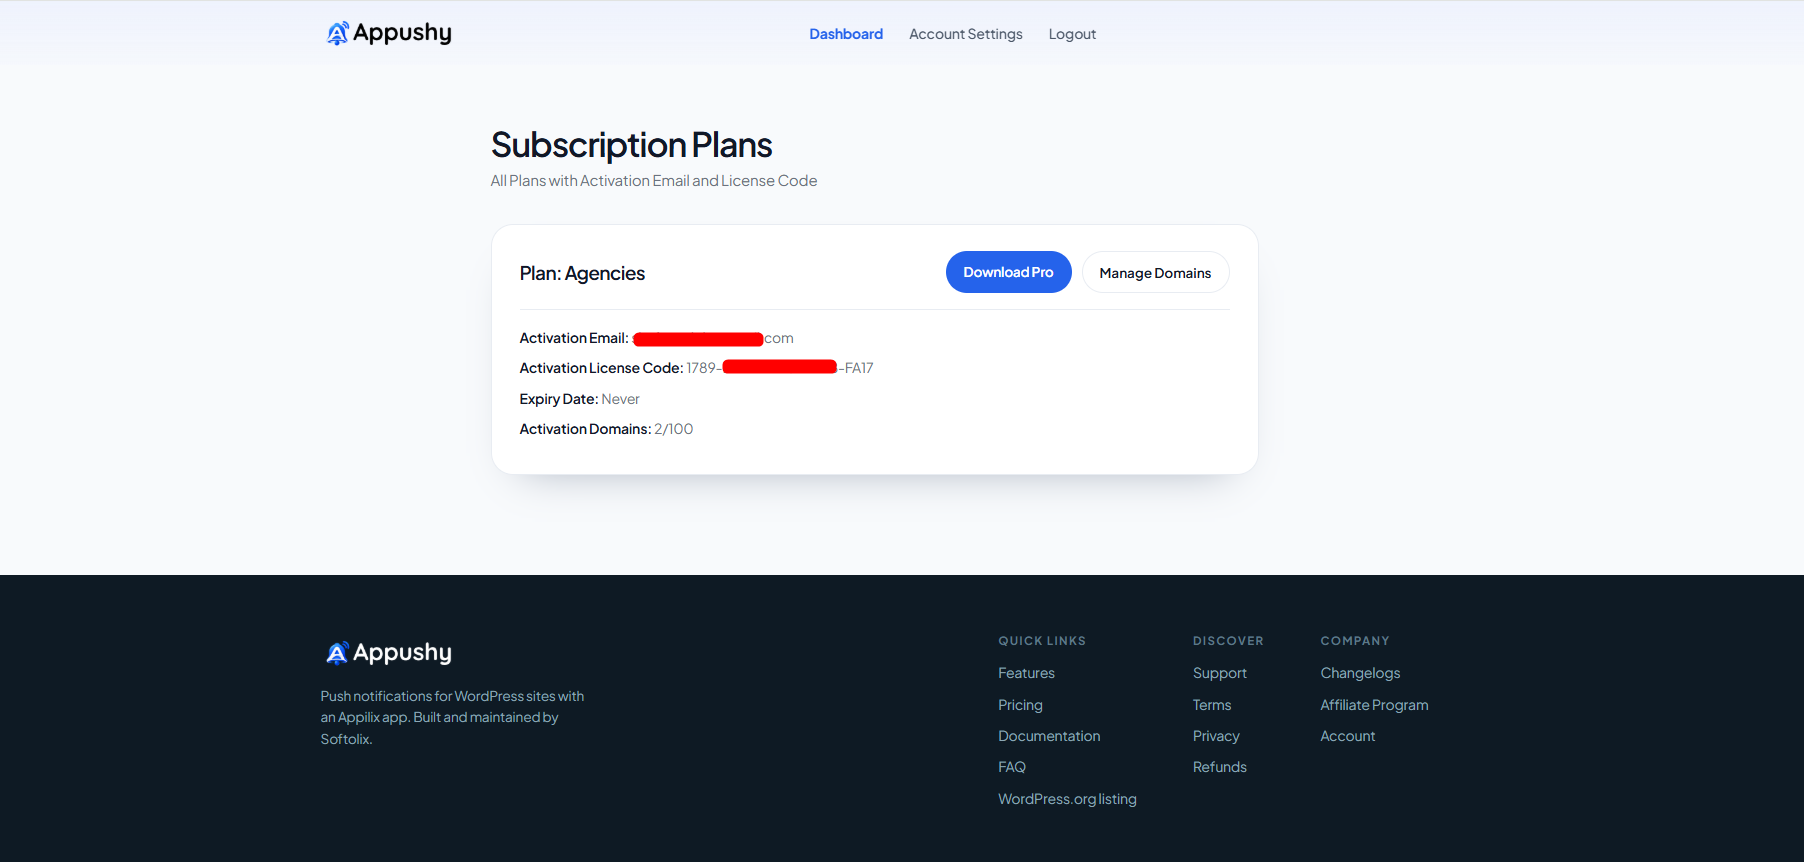
Once you've purchased, log into your Appushy account to find everything you need:
- A Download Pro button for the
appushy-proplugin zip file. - Your Activation Email and Activation License Code — the two values the plugin asks for.
- Your plan's site limit and a Manage Domains control, if you need to move the license from one site to another.
- Install and activate the downloaded
appushy-prozip the same way you would any WordPress plugin. - Go to Appushy → License.
- Enter the Purchase email and License code from your account dashboard, then click Activate.
Once active, the same screen shows your plan and a Deactivate button — use that if you ever need to free up a site slot before activating the license somewhere else.